venerdì 29 aprile 2011

I diffusori FLASH, falso mito


Il punto e' che c'e' una grande confusione con i concetti di DIFFUSORE e MODIFICATORE di luce

DIFFUSORE Da DIREZIONALE a OMNIDIREZIONALE. Serve per mandare la luce del flash al di fuori del cono di luce, generato dalla parabola del flash, che, specie nel caso dei flash zoom e auto zoom e' ovviamente ottimizzato per la focale che si sta usando, proprio per non buttare via luce laddove poi non si fara' alcuna ripresa. L'unico scopo del diffusore e' appunto il caso dell'ambiente piccolo in cui si sfruttano le pareti come riflettente e a quel punto diventa piu utile avere una luce OMNIdirezionale piuttosto che una luce Direzionale.

MODIFICATORI Variano la DIMENSIONE della sorgente di luce. Ombrelli, Softbox, Parabole, BeautyDish ma anche un muro bianco riflettente non fanno che ALLARGARE drasticamente la dimensione della sorgente, che essendo piu grande, fa una luce piu morbida.

DOVE CASCA L'ASINO E' facile far confusione. Infatti e anche commercialmente tanti ci marciano, molti confondono diffusori con modificatori, e pensano siano intercambiabili. Inoltre, nel caso del modificatore, la dimensione della sorgente e' in funzione della distanza e della dimensione del soggetto. Faccio un esempio, Una lampadina a distanza di 50cm da un insetto, e' una luce MORBIDA, perche e' grande rispetto al soggetto. La stessa lampadina a distanza di 4 metri da un umano, e' una luce durissima, e' minuscola in confronto al soggetto.
Quindi, Montare qualche accrocchio sul Flash ha senso se rispetto alla distanza e alla dimensione del soggetto noi abbiamo una sostanziale variazione di dimensione della sorgente, altrimenti, non si ottiene praticamente nessun beneficio.
Infine, ci sono i famosi Softbox portabili da montare sui Flash. Nella maggior parte dei casi funzionano per meta', perche' altro non son che dei coni con davanti un foglio dicarta bianca illuminato dallo stesso cono di parabola. Essi agiranno piu come diffusori, ma attenzione, non faranno nulla di piu di un foglio di carta traslucida messo alla stessa distanza, in grado di generare appunto, luce piu diffusa. Tale sistema, e' efficace se il foglio di diffusione e' molto vicino al soggetto, (si usa tanto in macro ad esempio), ma non se e' vicino al flash.

martedì 19 aprile 2011

Focal Plane Shutter Photography

This is one of the best photo ever.

It is the Henri Lartigue's photograph of a speeding racecar. The technical property of the camera focal plane shutter, is here used for an amazing artistic view of the world. A relativistic world where the speed of the car transform the objects in the space and in the time.
 I think in this picture, all the concepts of photography are summarized, use the best tecnique, at the best moment, for the best artistic picture.

 How was it possibile to take this picture? You have to understand how a Focal Plane Shutter works... and than... use it for taking action shots like the elicopter one. 

 Have fun looking also for slow scan photography, it is the same concept, but slower....

venerdì 8 aprile 2011

Scheimplflumg Principe


La mia formulazione didattica dell'astruso Scheimpflug Principe:


Quando su una retta si incontrano piano soggetto e piano nodale posteriore della lente e piano focale si ha la messa a fuoco.

In fotografia paesaggistica: Standarda posteriore fissa, muovo piano ottica.
 In fotografia macro, muovo la standarda posteriore per la messa a a fuoco. Questo perche movimenti della lente comportano significative variazione dell'inquadratura in macro fotografia!


Mio Algoritmo Metodo messa a fuoco view camera, successivo a eventuali movimenti di inquadratura di Raise, Fall & Shift:
  • Piano ottica parallelo a piano immagine. Metto a fuoco oggetto nel piano finale di messa a fuoco su un punto centrale in alto .
  • TILT: Metto a fuoco punto in basso. 
    • Ho accorciato il soffietto? Allora il punto in basso e' piu arretrato del punto in alto. Devo fare Up Tilt (La lente punta verso il cielo). 
    • Ho allungato il soffietto? Allora il punto in basso e' piu vicino del punto in alto. Devo fare Down Tilt (la lente punta verso il terreno). 
    • Ripeto la procedura TILT per approssimazioni successive.
  • Metto a fuoco un punto centrale a sinistra. 
  • SWING: Metto a fuoco punto a destra.
    • Ho accorciato il soffietto? Allora il punto a destra e' piu arretrato del punto in alto. Devo fare right swing (La lente guarda verso destra). 
    • Ho allungato il soffietto? Allora il punto in a destra e' piu vicino del punto in alto. Devo fare Left Swing (la lente guarda verso sinistra). 
    • Ripeto la procedura SWING per approssimazioni successive.
  •  Camera a fuoco. Scatto.


Immagine tratta da luminous-landscape.com

mercoledì 6 aprile 2011

Il cartoncino grigio 18% 12% Utilizzo


 E' lo strumento principe del fotografo, costa pochi euro, e,  sempre in borsa, o nel portafoglio ha tanti utilizzi, a patto che si stia parlando di un buon  Cartoncino grigio neutro tarato sul 18% o 12% secondo la taratura dell'esposimetro a luce riflessa della fotocamera realizzato con vernici a basso metamerismo.


Punto misurazione esposimetrirco per esposimetro a luce riflessa: E' l'uso piu banale, ma forse anche il piu furbo. Esponendo sul cartoncino, siamo certi di avere una corretta esposizione.

Esposimetro a luce incidente: Il cartoncino grigio neutro di pochi euro puo funzionare come un precisissimo esposimetro a luce incidente, che costa una fortuna... Come? Va usato in combinazione con l'esposimetro a luce riflessa della fotocamera. Misurando la luce riflessa dal cartoncino, si ha la misura di luce incidente nel punto del cartoncino stesso.

Esposimetro a luce incidente per flash: Stesso discorso di prima, se combinato con l'istogramma digitale della fotocamera. In studio, e' l'unico sistema che ci permette di misurare la luce oltre a un esposimetro digitale.


Bilanciamento del bianco: Se si tratta di un grigio neutro, il cartoncino puo funzionare da riferimento per il bianco sia in fase di ripresa che in sviluppo del negativo digitale.

Esposimetro macro: In macro-fotografia a soffietto o tubi di prolunga e' l'unico modo possibile di fare una misurazione a luce incidente. L'esposimetro a luce incidente non funziona per via del fall off dovuto alla perdita di luce dell'estensione.

Propongo 3 nuovi utilizzi mai suggeriti prima:

Calcolo T-Stop: Sono il primo a proporre questa tecnica: Abbinato a un esposimetro a luce incidente, permette di calcolare i T-STOP, questo diventa utilissimo in macro fotografia a soffietto o con tubi di prolunga, quando la corrispondenza tra f/stop indicati sul barilotto viene meno...

Riferimenti indiretti posizione luce in studio: Light Fall Off: Anche questa e' una mia idea:  piu cartoncini  per esempio in studio, si posson usare  per avere dei precisi riferimenti di Light Fall Off in modo da posizionare in modo sicuro le luci secondo schemi ben precisi alla distanza giusta. Il vantaggio enorme, e' che tali riferimenti son relativi alla luce e non alla posizione della lampada che puo cambiare se vengon montati dei modificatori.

Calcolo del numero guida del flash con una sola fotografia: Usando tanti piccoli cartoncini a distanza omogena (oppure quadratica, basta che ne teniate conto quando li guardate) si fa una fotografia con flash. Si va poi a cercare il cartoncino con l'esposizione corretta e sapendone la distanza, si ricava il numero guida del flash.

lunedì 4 aprile 2011

Falsi miti sul Flash

Alcune credenze popolari:

 Il flash si usa solo di sera/notte:  Falso. Il flash si usa ogniqualvolta sia necessario, e si usa soprattutto di giorno! il 99% delle mie fotografie e' fatta con almeno un flash.

 Il flash fa le foto sparaflashate: Falso. Il flash e' una luce come tutte le altre, e anzi, essendo controllata, e' potenzialmente la luce ideale. E' l'uso improprio che genera effetti orrendi, ma tutte le fotografie professionali, specie in studio e all'aperto, son fatte con le luci flash.

Il flash fa gli occhi rossi: E' vero, ma il motivo non e' dato dalla luce del flash, ma bensi dalla posizione della luce flash. La funzione anti occhi rossi, usa uno stratagemma, emette dei pre lampi che fanno chiudere l'iride del soggetto per ridurre il fenomeno.

Il flash fa una luce azzurrata: Estremamente falso, i flash hanno una temperatura di luce dai 5000 ai 6500K, ovvero, son tarati, per fare esattamente la stessa luce che c'e' di giorno, per dare i risultati piu naturali possibili. L'effetto foto azzurrata dipende dal fatto che di sera, specie in appartamenti e locali, le luci son a tungsteno, con temperature sui 3000K o anche piu basse. Un uso improprio fa si che la camera usi un bilanciamento del bianco sulla luce ambiente, e questo fa apparire la foto del flash azzurra.

 I diffusori da montare sul flash migliorano la luce, eliminano le ombre nette: Falso. E questa e' una bufala commerciale in cui tanti cascano, non a caso son in vendita accessori come GaryPhong, Small umbrella, Lastolite e diffusori di ogni sorta... La durezza della luce dipende dalla dimensione della sorgente e dalla distanza. Un diffusore di qualche cm su distanze di uno o due metri non cambia  la dimensione del flash. Provare per credere.
 I diffusori diffondono, ovvero, invece di indirizzare la luce verso il soggetto (cosa per cui i flash professionali hanno la  parabola zoom e la lente di fresnel), la sparano ovunque, anche fuori dall'area in cui si trova il soggetto.  Questo e' un ottimo modo per buttare via una marea di luce. L'unica, ma veramente, l'unica utilita' di questi accessori, la si ha in ambienti chiusi molto piccoli, in appartamento, ad esempio, qualora le pareti siano bianche e riflettano la luce diffusa.


 Prossima puntata... Come funziona dal punto di vista fotografico un Flash?

Diaphram STOPs & Area of a Circle


Do you know why photo diaphragms stops have these strange numbers like
f/1.0  f/1.4   f/2.0  f/2.8  f/4.0   f/5.6   f/8   f/11  f/16 f/22 ?

It is very easy. This comes from the Area of a Circle formula! Lens are circles. The amount of light captured by a lens is proportional to the area of the aperture. The area of a Circle is :  r^2 * pi ;

To double the AREA of the circle, we have simply to multiply for the square root of 2 the radius!


Example1:  radius = 1.00 cm, Area = 3.14cm^2
Example2:  radius = 1.41cm,  Area = 6.28cm^2

So, in a photographic lens

where f is the focal length and N is the aperture Number. That explain why each diaphragm stops corresponds to the half of the light captured by the lens, and that-s, why, to have the proper exposure, you can simply double the exposure time.

venerdì 1 aprile 2011

Nikon Flash in P Mode Aperture Lock... EXPLAINED!

After one month of investigation, I finally discovered the logic behind the Nikon P mode, when there is a flash activated.

If you remember, the problem was to understand WHY when we use the flash in a Nikon DSLR camera in automatic P mode, the P mode is blocked and there is no way to use the P* shift, and, also the aperture is reduced at an apparently random value, and is also reduced when the ISO is gained up.

 The problem is that The Photographer logic seems not be followed by the P program....  Because,  if subject is in low light conditions, if I activate the flash, if I increase the ISO... This means I would like to catch as maximum light as possible from the scene, and, apparently,  seems completely stupid or not logic to close the aperture, as the P program does!

But, of course, there is an explanation...


The P mode with flash logic is to completely delegate the lighting to the flash and the exposure calculation to the FlashTTL system.

To do that, as the flash is activated, the camera blocks the shutter at the SYNC Speed.

SYNC Speed breaks the logic behind the P* shift program.  If the ambient light permits to set a different sync speed between the mimimum and maximum sync value it is still possible to change the sync speed, but, for this explanation, let-s consider the Shutter speed  BLOCKED at the SYNC speed. 

As the shutter time is blocked at sync speed,  the reflective ambient light meter is ignored (but it does not goes off!),  there is no way to calculate the right exposure  because the light will comes "only" from the flash, not from the scene! Again, there is no way to do a Shift between different P* modes, because the Shutter speed is blocked!

 Lot of confusion comes from the fact that Nikon P* still works when the gears are rotated, but P*  works "in the background": P* is displayed...  P* does not change Shutter and Diaphragm? Apparently. The shift does not work because the flash is on,  but if you switch  the flash off, the P* goes in the shifted program you set!

Let's go back to the main problem: Which aperture the P program choose when the flash is on?


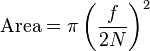
 Remember! The logic is to delegate the exposure calculation to the FlashTTL system.... With this logic the P program sets an f/ that gives the maximum degree of freedom at the TTL system in a standard subject distance case. The best f/ number,  is influenced by the medium Guide Number of a TTL flash.

To understand that, let's take as example a faulty case:

The TTL flash can automatically change his power, from a minimum GN to a maximum GN. Supposing, with the photographer logic, we mount a wide aperture lens, because there is low ambient light, we increase the ISO, we set the aperture at f/2.0 and we shoot a subject that is very close... The Flash has to fire with these settings at a very low power in order to get a good exposure... It can happen that the minimum power of the flash is still too high, and, as result, the main subject is over-exposed.
That's because f/2.0 was too wide for a standard  close subject with a TTL flash of that power, or, the Flash, was too powerful for a so short distance... Choosing  the wider aperture of the lens,  with the flashTTL on, it could be not the best choice, because, even if the light is low, the FlashTTL system has a very little degree of freedom of reducing the Flash Power.

And remember (!!! very important point in this logic!!)  when the subject is close to the light, the power of the light becomes CRITICAL because of the very short distance  fall off, that could be of only few centimeters!! So, when the subject is close to the flash, it is extremely important to set the proper light power with a precision that increases as more as the subject get closer to the flash.

Summarizing, the Aperture is calculated depending on the medium Guide Number of the flash in order to give the maximum degrees of freedom in terms of flash power settings to the FlashTTL system. Increasing the ISO, of course, the equivalent GN increases, so, the f number goes down!

At ISO 200, the P mode with the D700 in camera flash, the aperture is reduced at a maximum value of  f/3.5, with the SB600 it is reduced at f/5.6

The SLOW mode, is apparently stupid. If there is a low light condition scene and the photographer would like to get the light from the background, Why do not open to the  widest aperture automatically? Again,  the logic is to delegate all the exposure of the main subject to the FlashTTL and give to the flash maximum range of possibility of getting the right exposure of the main subject.

So, the aperture remains blocked as discussed before depending on the GN, and SLOW mode uses only the shutter speed to get the light from the background according from the ambient light measured by the internal reflective light meter.


Amazing logic! but never documented before.


Luigi Gallerani

Become a Model is in GENEVE for Glocals Community!


Become a Photo Model for a Studio Session! Picture

Become a Model for a Studio Session! Let's try to have a shooting in a professional Photo Studio with Luigi Gallerani, a Professional Nikon NPS photographer. TimeForCD/TimeForPrint if you are at the first experience.
 See mon on the GLocalsActivity  link!